
The Mad Agriculture Journal
Prairie Strips Seed Packet
Published on
September 03, 2024
Written by
Omar de Kok-Mercado
Photos by
Jonnah Perkins
Inside the Making of a Prairie Seed Mix
To celebrate and share our Prairie Strips Project, we created a seed mix designed specifically for the Upper Midwest and packaged it up into seed packets to share with our fellow Midwesterners. The process was very hands-on - from Omar de Kok-Mercado, our Midwest Regional Lead, designing the mix with Otter Creek Seeds and hand stamping the packets, to Jonnah Perkins, our Media Director, measuring out the seeds and sealing the pouches with her daughter at the dining room table. This project was made with love. As a micro-expression of the larger Prairie Strips Project we are rolling out later this year, the Seed Packet Project is just the beginning of how we will be bringing the beauty of prairie strips to life.
.png)
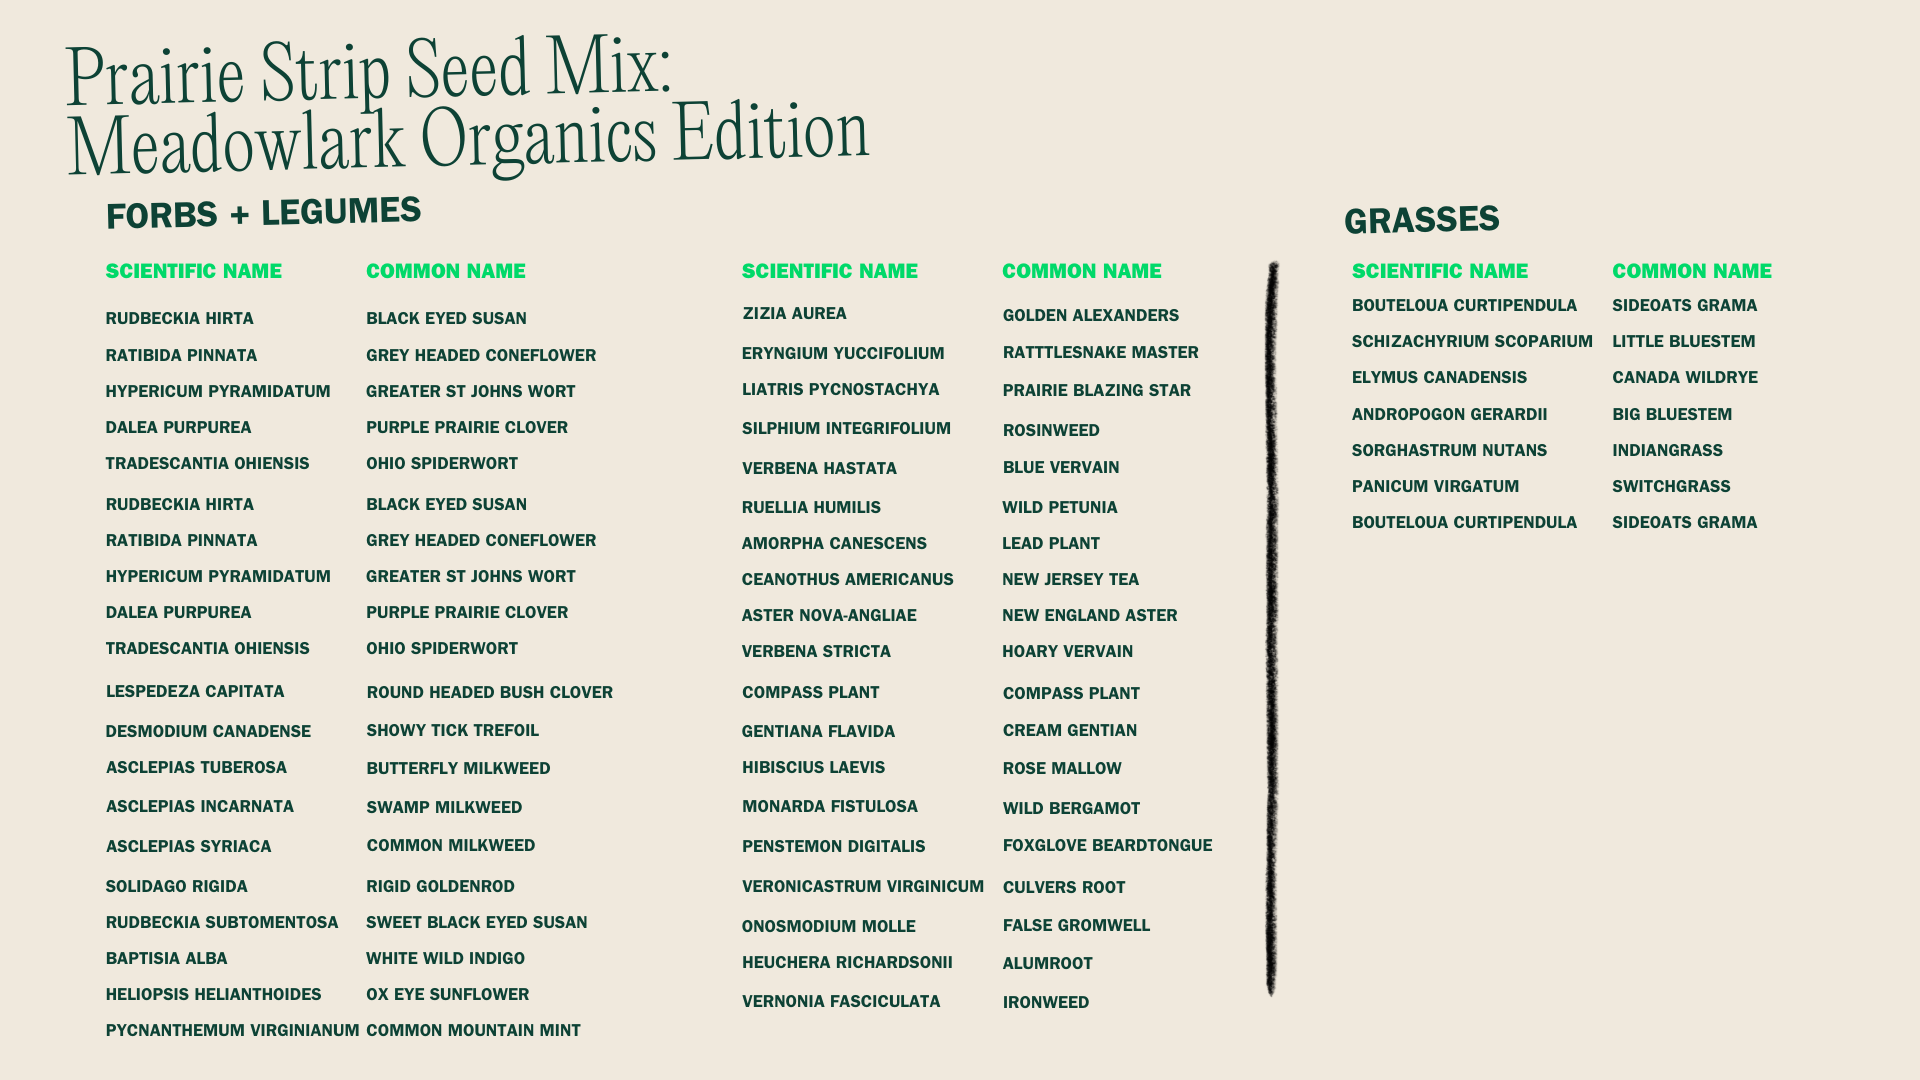
Meadowlark Organics Edition
Ridgeway, WI 42.989289078137, -90.01021455766221
We asked Omar de Kok-Mercado, Mad Ag’s Midwest Regional Lead, what went into his process of designing the Prairie Strip Seed Mix: Meadowlark Organics Edition
What is the process of designing a prairie seed mix?
High-quality remnant prairies can host over 300 plant species, but replicating this diversity is often cost-prohibitive, as some rare species’ seeds can cost up to $200 per pound. Fortunately, only a small subset of species’ seeds typically dominates the overall biomass, making prairie reconstructions more feasible. This is why I prefer the term “reconstruction” over “restoration”—a reconstructed prairie, even with just 10% of the original diversity (around 30 species), could still replicate many of the ecological functions of a remnant prairie. Restorations are reserved for degraded prairie remnants. From a resiliency and stability standpoint we prefer to shoot for somewhere in the 55 to 75 species count. Diversity is the key to a successful prairie planting. What’s in a specific prairie seed mix and at what seeding ratios (seeds per square foot) depends on your objective (erosion control, water filtration, wildlife habitat, or pollinator support) and where the prairie is going to be strategically integrated on the farm. The mix should ensure seasonal diversity and contain at least two flowering species for each season– spring, summer, and fall. The seeds should be matched to specific site conditions because different species have different tolerances for moisture, light, and soils. Get local ecotype seed when you can.
Who were your partners in designing this mix?
As soil scientists like to say, ‘If you put 12 soil scientists in a soil pit, you’ll get 12 different opinions.’ I’ve found the same to be true when it comes to designing seed mixes—it’s as much an art as it is a science. Unfortunately, we no longer have millions of acres of remnant prairie to study the natural dynamics of species dispersal and abundance, so much of our work today is based on inference and reconstruction. Because of this, I like to bring in as many opinions as possible, drawing from a wide range of expertise to build the most informed and ecologically sound seed mix.
I first collaborated with Tim Youngquist of Otter Creek Natives in Iowa to design the baseline mix for the Meadowlark Organics seed packet. Tim, also the Farmer Liaison for the STRIPS project at Iowa State University, brought his years of prairie research into the process, making it a full-circle moment. The 15 years of STRIPS research allowed us to build a market-based incentive for prairie integration on croplands, with funding support from Whole Foods Market. To enhance the seed mix, Tim brought in Jon Hudson of Diversity Farms, who contributed additional species.
Once the baseline mix was complete, I worked with Micah Kloppenburg, the Xerces Society Pollinator Habitat Specialist in Wisconsin, to further refine it. Together, we increased the diversity of the mix for the Meadowlark Organics planting. Finally, we sought additional feedback from experts like Aric Elton at Shooting Star Native Seeds and Colleen Quiram from MNL in Minnesota, ensuring the mix was as robust and ecologically beneficial as possible. The memory of each conversation and purpose is nested in the mix.

Can you describe the Meadowlark Organics ecosystem?
Meadowlark Organics operates a regenerative organic farming system situated in the Driftless Area of Wisconsin, a region characterized by its unglaciated hills and rich biodiversity. The farm’s ecosystem thrives on sustainable practices like diverse crop rotations, cover cropping, and rotational grazing, which are specifically designed to enhance soil health and conserve water. Their seven-year crop rotation includes organic grains such as wheat, rye, and spelt, alongside beans and corn. They also minimize tillage by using techniques like roller-crimping rye before no-till planting soybeans. With this prairie reconstruction project, Meadowlark will expand on existing prairie plantings with an additional 25 acres of native prairie. In 2021, Meadowlark launched a community mill to process their grains into stone-ground flour, fostering local food production and supporting their rural community. Just like the prairie ecosystem, if Meadowlark’s farm ecosystem could be replicated across millions of acres, we’d be swimming in cleaner waters, dancing with pollinators, have richer soils, happier critters, and Mother Nature would be high-fiving us all the way.

How did you create the art on the seed packet and why did you choose to have multiple designs?
The process was pretty far out of my typical creative wheelhouse; but I had fun rekindling my love for ink. Having multiple designs was less of an active choice and more of a product of the process. I doodled prairie memories until certain elements stuck out and resonated. The memories on the two prairie-based stamps are undergrad recollections of my time spent monitoring ecosystem hydrology within the OG Iowa State STRIPS sites at the Neal Smith Wildlife Refuge outside of Prairie City, Iowa. Looking closely at the stamps you’ll get a sense of the encapsulation that prairie gives you when you’re really in it. It’s subtle. Digital scans of the art were scanned in and laser cut onto rubber and then black ink was used on a stamp pad. Each seed packet was stamped by hand!

Planting your seed mix
Materials Needed:
• 1oz prairie seed packet (mix of native grasses and wildflowers)
• 4 to 8 cups of sand (for mixing with seeds)
• Garden rake
• Watering can or hose with a gentle spray nozzle
• Light wood mulch or leaf mulch (for covering seeds)
• Large mixing bowl or bucket
• Measuring cup (optional)
Site Selection:
1. Sunlight: Choose a location that gets at least 6 hours of direct sunlight each day.
2. Soil: Prairies thrive in various soil types but prefer well-drained soil. If uncertain, a simple soil test can help determine if any amendments are needed.
3. Area: Your 1oz seed packet will cover:
• 100 square feet for dense planting
• 200 square feet for lighter coverage
Time of Planting:
• Spring Planting: Planting in early spring (March to May) allows seeds to take advantage of spring rains and warm soil temperatures.
• Fall Dormant Seeding: Alternatively, you can plant in late fall (November to early December) before the ground freezes.
• Frost Seeding: Done in late winter or early spring (e.g., February to March). Seeds are broadcast on frozen ground, and freeze-thaw cycles help them settle into the soil and naturally stratify over winter, which can enhance germination.
• Avoid Planting in Hot Summer Months: Prairie seeds require consistent moisture to germinate, which can be challenging to maintain during hot, dry summer months. If you plant in late spring or summer, be prepared to water frequently.
Site Preparation:
1. Clear Existing Vegetation: Remove grass and weeds without using chemicals. Hand-pull or dig out roots, or cover the area with cardboard and mulch for a few weeks to smother existing plants.
2. Prepare the Soil: Use a rake to lightly roughen the soil surface, creating shallow grooves that will help the seeds settle.
Mixing the Seeds:
1. Measure the Area:
• For 100 square feet, use the full 1oz of seed.
• For 200 square feet, use the full 1oz of seed but spread it thinner.
2. Mix with Sand:
• In a large mixing bowl or bucket, combine the seeds with 4 cups of sand for a 100 square foot area or 8 cups of sand for a 200 square foot area. The sand helps ensure even distribution of the seeds.
• Alternative to Sand: You can use finely shredded wood mulch or leaf mulch instead of sand. Use about 4 to 8 cups, depending on your area size.
3. Mix Thoroughly: Stir the mixture well to ensure that the seeds are evenly distributed throughout the sand or mulch.
Distributing the Seeds:
1. Hand-Broadcasting:
• Grip the mixed seeds in your hand. Take a handful of the seed and sand (or mulch) mixture.
• Starting at one edge of the area, scatter the seeds evenly by flicking your wrist in a smooth, side-to-side motion, while squeezing your seed mix tightly. Aim to spread the seeds in a wide, even arc as you walk. It will seem like you are ‘dusting’ the area rather than seeding.
• Move methodically across the planting area, ensuring even coverage by overlapping slightly with each pass. You’ll likely feel like you need to seed more heavily but it’s best to be scant and cover the area several times to ensure even distribution of your seed mix.
2. Tips for Even Distribution:
• Divide the mixture into equal parts (e.g., half or quarters) and cover the area in sections. This helps ensure that you don’t run out of seeds before the area is fully covered.
• If you’re unsure, consider broadcasting the area twice with half the mixture each time, walking in perpendicular directions to ensure even coverage.
Pressing the Seeds into the Soil for Spring and Fall plantings:
1. Lightly Press: After broadcasting the seeds, use the back of a rake to gently press the seeds into the soil. This helps ensure good seed-to-soil contact, which is crucial for germination.
2. Alternative Method: For small areas, you can simply walk over the planted area to press the seeds into the soil.
Covering the Seeds:
1. Mulching (optional for Spring and Fall plantings):
• Lightly cover the seeded area with a thin layer of finely shredded wood mulch or leaf mulch. Use just enough to barely cover the seeds; this protects them from birds and helps retain moisture.
• For 100 square feet, use about 1 to 2 cups of mulch.
• For 200 square feet, use about 2 to 4 cups of mulch.
Watering:
• Initial Watering: Gently water the area immediately after planting to settle the seeds into the soil. Use a watering can or hose with a gentle spray nozzle to avoid washing away the seeds.
• Ongoing Care: Keep the soil consistently moist until seeds germinate, which can take a few weeks. After the plants are established, water as needed, especially during dry periods.
Ongoing Maintenance:
1. First Year:
• Growth Expectations: Prairie plants invest heavily in root development during their first year, which means above-ground growth will be slow. This is normal, and the prairie may look sparse and weedy during this time.
• Weed Control: Hand-pull weeds regularly to prevent them from overshadowing the young prairie plants. This is crucial during the first year to give your prairie plants the best chance to establish.
• Mowing: Mow the area regularly (2 to 3 times) during the growing season to a height of 4-6 inches. This reduces competition from fast-growing weeds and allows more light to reach the prairie seedlings. Avoid mowing too low, as this can damage the young prairie plants.
2. Second Year:
• Continued Mowing: Continue to mow the prairie 1-2 times during the growing season to a height of 8-10 inches. By now, the prairie plants should start to become more visible, and the mowing will help control any persistent weeds.
• Spot Weeding: Hand-pull any remaining invasive or aggressive weeds that threaten to outcompete your prairie plants.
3. Third Year and Beyond:
• Reduced Maintenance: By the third year, your prairie should be well-established, and mowing can be reduced or eliminated. Occasional mowing or cutting in late fall or early spring every 2-3 years helps manage growth and promotes plant diversity.
• Prescribed Burns (Optional): If possible, consider conducting a prescribed burn every 3-5 years. Fire is a natural part of the prairie ecosystem and helps to reduce thatch, control woody plants, and stimulate new growth. If burning is not an option, mowing and raking off the cut material can achieve similar benefits.
Enjoying Your Prairie:
As your prairie matures, it will become a thriving ecosystem full of native grasses, wildflowers, and the pollinators they attract. Each year, the diversity and beauty of the prairie will increase, providing a lasting source of enjoyment and environmental benefits.
Learn more
Prairie Strips: A Cornerstone of Regenerative Agriculture
